Deviation Actions
After being a member of several artist alleys for 10+ years, I thought I should share my knowledge in a practical guide. This was originally posted as a four-part series back in 2012, and has since been updated as recently as 2020.
This is meant to be a good start for those who have never been a part of an artist alley before, as well as a nice refresher to those of you who are veterans of alleys everywhere. I will try to be as detailed as possible while making the information easy to reference and read through.
Here are the links to Part 1 and Part 2 if you'd like to take another look!
--
ARTIST ALLEY 101
Part 3
DISPLAYING YOUR WORK
Now that we have taken a look at what to make and how to price your work, here comes the fun part: trying to figure out how to actually display everything at your table so it has maximum appeal to your customers!
There are so many ways to arrange your vendor space, yet a lot of people are unsure of how to do it and opt for the old 'place everything flat on the table' method. This may be the easiest setup, but it's certainly not going to get you noticed at a big event. People may just pass you by, even if you have really good art to sell. You want some dimensionality and layers to your table, eye-catching elements that draw a person in to look at your treasured work. The way to do this is to make sure your table design works in 3 dimensions.
Of course, everything depends on what exactly you are selling at your table. If you have a little bit of everything, it will be much easier to design effective ways to display it versus having only 2-dimensional merchandise such as prints and commissions. However, even with folks who sell mostly prints, I've seen a great deal of investment in table design that has advertised their work effectively to me from across the room.
So, without further ado, here are some helpful tips for figuring out the best possible way to display your work.
Displaying large prints, plushies and other 3-dimensional items
When you have items that are already tall, wide and fluffy, display can be as simple as arranging your plushies and accessories off to one side of the table, or as two parentheses that bracket your table. This can be effective if you only have half a table and don't want customers to confuse another artist's half with your work. If you have more space, definitely try using small shelf-like boxes to put smaller plushies inside, as if they're resting in a little cubby.
When you have mostly prints and poster-sized pieces, you want to arrange them vertically, not horizontally. You can have a few of these samples directly on your table, but make sure they are neatly placed inside a portfolio that can be handled without fear of falling apart. Outside of the portfolio, you need to have work that can be seen by people from far away, across the room, and right as they come in. You can have a tabletop easel that can stand up and display some of your larger pieces, or arrange poster board stands with a few of your pieces posted up. I have often seen what looks to me like a display made out of pvc pipes: two pipes are installed on both ends of the table that connect to another pipe above to make an upside down U, where people pin work up all around it so it frames their table. This may be a pretty complex and expensive method, but if you're more of a hands-on person it may not be so complicated to achieve!
If you are selling jewelry, you are in luck. There are several types of stands made just for jewelry, whether you are selling rings, necklaces or hair accessories. Have a few of these around your table and arrange your jewelry by color or by type for a nice organized finish. Another great way to display jewelry is by putting similar items like hair clips in different colored bowls or baskets. You can cover the inside with a pretty kerchief or if the bowl already has a cute design on it, then that's a big plus!
Displaying smaller pieces such as buttons, keychains, stickers and more
These are the kinds of things I'm more familiar with selling, and therefore this advice comes from first-hand experience!
When you are selling something as tiny as buttons, you want to make sure you're not just putting them in a big bucket for people to pick through. You could technically do it that way if you have a few of them on sale or you want to separate the "defective" buttons and still make a profit by selling them for less. However, I would not recommend you do this for your main products. You want your latest and greatest work to be the stars of your table, so you're going to have to come up with a more creative way of displaying them.
You can conceivably print a large poster-sized catalogue of the buttons you sell, categorizing them either by alphabet or in a number system. I have seen lots of people do this when selling exclusively buttons, and it is a great confusion-free solution. With this method people can view them all without you having to put them all out! Imagine trying to keep track of the dozens of buttons spread all over your table? No way! This method is convenient because you can keep adding to the poster and display it with an easel or some other form of stand, while keeping the actual buttons organized in little bags or in an organized shelf system. That way, when people tell you "I want the number 4 button", you can reach for the bag or shelf with the number 4 on it and they will get the desired button, no fuss! You can pin buttons on a poster board, cork board or memory board and label them as "display only" so that people don't accidentally take your samples out. It might be really helpful to have signs that say the customer should ask for the button they want and you'll get it for them in a separate container. In fact, signs that tell the customer to ask for any of the items at your tablet before taking the display ones is probably a good idea.
When you are selling items that are a little larger such as magnets/phone charms, I liked to mix things up. For instance, if I didn't have as many keychains as other items, I put them up on a cork board with little colorful pins. I kept the spare copies of a keychain in little labeled bags and arranged them alphabetically. The same with magnets and charms, I set up a small magnetic display to put up a few samples (verticality is the name of the game) and the rest displayed flat on the table. Having a few vertical elements at my table display made it so when people spotted it from a distance, they were drawn in to all the items lying flat on my table.
I have seen items like stickers, postcards, pins, and stationery being packaged quite nicely these days. Stickers and sticker sets can come in nicely designed sheets with the title of the series they belong in or just cut out in their own separate sheets and wrapped in a plastic sleeve so they're an individually packaged item. I have also seen greeting cards and postcards packaged in little envelopes and plastic sleeves, and in the case of the greeting cards, packaged with matching envelopes that you can use for mailing. If you have buttons or enamel pins, designing a little backing card for them can be a great way to make them look professional. These are really great ways to make your items look special, as well as show that you've put in the time and effort to make your work look really nice!
Be aware of the traffic flow in the alley!
When planning your display, or even when you set everything up at the table, be aware of where you are in the alley and the amount of traffic coming from all directions around you. If you have a gap between your table and your neighbor's, both you and the artists next to you will be using that space to travel around the convention and get food/take bathroom breaks/etc. You are going to run the risk of having your display fall constantly if you place it right at the edge of the table where the gap is. And not just you, but con goers may also think to use that space as a way of "cutting through traffic", not knowing that it makes your job harder to keep everything vertical on your table in place. So make sure your setup is sturdy enough to be childproof and tired-artist/nerd-proof!
Map out your table display ahead of time.
If you are a bit extra like me, you can practice setting up your display at home. Take a photograph of it or draw a diagram of where things go that you can save for later. Once you arrive at check in and completely get swallowed up in the last minute dashes and mishaps, by the time you arrive at your table chances are you won't have much time left to set up before the convention is open to regular attendees. So what do you do to save time? Grab your photo or diagram you made earlier and whip it out for reference! It will definitely give you peace of mind. Once I had maybe 5 or 10 minutes to do a full table setup before an event started, and that diagram saved the day. Sometimes it pays to be extra!
Other display advice
Make sure your setup looks organized, and that your items and merchandise are neatly packed for your convenience. This way you are showing professionalism to your customers, and you save hours of headache and stress!
Ask fellow artist alley neighbors what sort of supplies they use to display their work and where they get them. Artists are all in it together, and they want to help each other out! So asking them is the best way to get information on something that caught your eye. Chances are they'll be more than happy to answer your questions. This has been the most effective way for me to get new ideas on how to make my setup more efficient and professional.
No matter what your display looks like, make sure you bring some kind of tablecloth to add that extra layer of polish and uniqueness to your table. A bright color or fun pattern will help your table pop as well as complement your work. I have also seen artists get really creative with how they decorate their table, by adding fun little details like paper lanterns, tea lights, color-coordinated banners and signs, figurines, a funny tip jar, etc. There are a lot of tables for convention attendees to see, so making yours stand out in whatever way you can think of makes it fun for them to point you out or to find you later when they bring their friends over!
And remember, trial and error is a normal part of your journey as an artist alley seller. If you didn't like the way your stuff looked on the first day, do it differently the next! Or if you noticed a great display from one of your alley neighbors that inspires you to improve yours, go for it! A good test of your progress is to document your table displays at every con by photographing it. That way you can reference it at a later time and compare it to your latest display ideas.
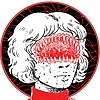
Before we move on, I would like to visually show what I have explained thus far with table displays:
Bad display. Look at that mess!
This was what one of my first tables looked like back in 2008 (I feel really old now). It was one full table at a 3-day convention, featuring me and three other artist friends. Clearly we didn't have things organized or put together in any cohesive way, and it was a miracle that people stopped by to look at our stuff at all! All of our work was piled upon each other, our price lists were written out on paper with markers and taped to the edge of the tables where no one could see them, clearly showing that we were pretty amateur at this. We clearly had much to learn.
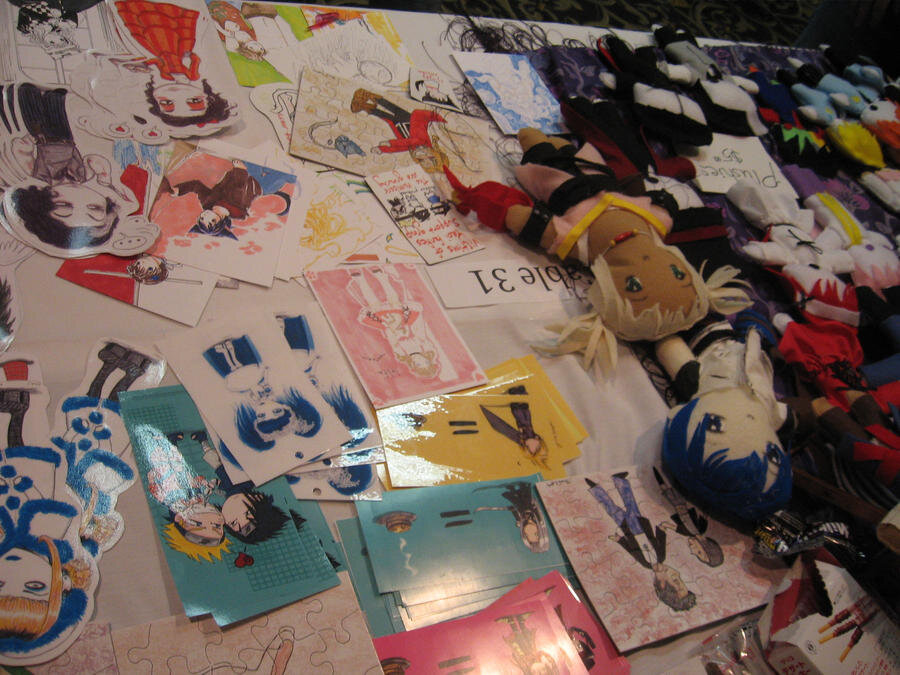
Many years later and...
Better display. Acceptable!
This display is from around 2014. I shared one table with another artist friend, and clearly both of us had a LOT more stuff but it was all arranged and thoughtfully put together. Notice that it's not a super amazing display, but at the very least it's organized, has a mix of flat and vertical elements, legible price lists at the customer's eye level and so on. Also the nice tablecloth color brings out the work and makes the table pop out from the crowd. You can do this too without using anything overly fancy, and come up with other methods of display as you continue on your artist alley journey! The key is to be organized, not like the hot mess I started with!
I have been in the process of redoing my stock (as I sell very different art and items now), but I hope in the near future to get a more recent table display photo for comparison. What over a decade of artist alley experience has culminated!
—
AND NOW, TIME FOR A LITTLE CLASS ON ETIQUETTE!!!
Here's a list of advice, tips, and things to keep in mind when running your table. And because I have heard a lot of horror stories from artists in recent years about customers they have encountered, I am not only going to do a list of good artist etiquette for those BEHIND the table, but also compile a list of good behaviors to keep in mind when you are a buyer or a regular convention attendee IN FRONT of a table.
ARTIST/SELLER ETIQUETTE
DO have someone manning the table at all times.
DON'T leave your table unattended!
Have at least one person (or yourself) at the table at all times. While it is important to take breaks so you don't exhaust yourself, make sure you get someone else to help take over the table while you're gone. People may think you won't come back, or worse, steal stuff from your table! This happens to more artists than you’d think. Don't run that risk.
DO have all your table mates' phone numbers.
DON'T get caught stranded, not knowing where your table mates are!
If you are participating in the artist alley with friends or other helpers, make sure you keep their contact information handy. A good way to make sure you know where your friends are at all times is to make a print-out schedule showing where people will be, when they want to get food, when they want to go to a panel, etc. The worst thing is not knowing where they are and not having their phone number to call them when you need them! This comes from direct experience, having had that done to me as well as having done that to others! So be considerate of your fellow artists/friends who are sitting there waiting for a reprieve!
DO keep track of sales by making an inventory.
DON'T not have any way of figuring out who made how much!
This applies to both you as an individual and as a group or partnership. You want to make a spreadsheet that includes all the items you will be selling and how many of each you have. If you need to, make separate columns for Day 1, Day 2 and so on so you can keep track of what you (and others) made throughout the weekend in an organized fashion. This is also a great marketing tool to determine what sells out or what people buy the most!
If you use Square to accept payment, then keeping an online inventory in your Square account will also be a great business tool. It will keep track of your purchases for specific items, and notify you if you are running low on stock for said items! I highly recommend it, especially if you have a separate online store to go with it.
DO put money in a cash box or other safe storage.
DON'T leave cash out in the open, or somewhere you don't have immediate access to!
It's very important to have a means of storing all that money people will be handing you! Put it in a practical and handy cash box, and make sure you or someone else at your table is guarding it with your life! And keep it organized by bills or change. This will save you and your customer time. Also make sure it's closed and locked away at your table, or when the day is over, in your hotel room. You definitely don't want people to steal your earnings.
DO bring enough change with you.
DON'T do the opposite!
During my first time as an artist alley seller, a person came up to me to buy one of my friend's plushies listed at $5. She handed me a $50 bill. I didn't have any change, so we lost a bit of money with that transaction since I had to scrounge around my friend's wallets for change (everyone else was away at the time). Don't get caught in this situation, especially early on in the day/weekend when people haven't broken into their big bills fresh from the ATM. Always bring tons of $1s and $5s. You never know what you'll be handed, so be prepared. And on the opposite end, if you're one of those artists that has brought a lot of change, other artists from nearby booths might be coming to you for help with whatever they need to break at their table. This is one of many ways to make friends at any event!
DO be friendly and helpful to your customers! Greet them when they check out your table and don't be afraid to chat with them.
DON'T be rude, grumpy, or just look like you don't want to be there.
You are the best spokesperson for your art, so why not show it! Practice your people skills, reel potential customers in by striking up conversation with them. Be alert, friendly and helpful! If you're grumpy or rude, you may have good art but people won't be encouraged to linger at your table to look at it. This is especially so if you seem more interested in looking at your phone than talking about your work. Besides, you never know when you'll meet that one person that would've bought a ton of stuff from your table if you were just more approachable. And for those of you who are shy, just speak up and be friendly! You don't have to act like a totally different person, but show off some confidence! You'll be surprised by how being friendly encourages people to check out your art and even buy something from you.
NOW IT'S TIME FOR CUSTOMER ETIQUETTE!
At long last, some tips for you as a customer on how to interact with artists in the alley!
DO chat with the artists, even if you just say hello.
DON'T be scared of them!
Chances are, artists behind the table will be friendly and not mind having a chat and answering any questions you might have. Some good suggestions for things to ask them are how they have been doing so far at the con, have they been getting a lot of traffic, etc. Compliment their work, especially if something specific jumps out at their table. This might be a good way for artists to tell if something is doing well or if there is a lot of interest in particular items/fandoms/merchandise, and they can store that information away for later when deciding on new items to make for next time.
If you are really shy, then just say hi! Most artists I know of don't bite. Sometimes if you are really really shy, or aren't sure how to exit a table without feeling impolite, simply take a business card from the table and thank the artist before you leave.
DO show interest in the artists' items.
DON'T diss their work or any fandoms that you don't like!
Like i said in the previous bullet, letting artists know what you really like from their table can be helpful. It also can be a great conversation starter if you recognize a fandom that you get excited about, or if their style or art really stands out to you. This means you and the artist already have something in common. HOWEVER, do not talk their ear off about the nitty gritty niche subreddit you created to go on and on about a specific anime episode or game or whatnot. You don't want them to get too distracted with conversation to neglect helping other customers out. And besides, if you want to talk more at length with them, maybe wait until they have a lull in the crowd to do so, if they seem interested in continuing the conversation. I have had many people just rattle off stuff they like/don't like about a particular character or fandom, and it's just kinda...awkward? Because I can only go so far in my responses to topics like that without quickly running out of things to say. Less is more in this department!
Also some other bees in my and other artists' prospective bonnets are:
-When someone points out that your fan art of a character is not the perfect replica of that character (something is in the wrong color, different weapon, etc.) although sometimes it can be helpful if you are polite about it. For instance, I once had someone complain that a fan art of a character I made didn't have the right shade of pink to their outfit. And they were kinda rude about it, too. But I also had someone point out to me that a different fan character had the wrong detail on their shirt, but they said it in a nicer, more helpful way. I responded to this much better because it was more about knowing how I could fix that detail the next time I did a restock of that item!
-When someone just outright disses a fandom you happen to like and also happen to have put a lot of work into making art for, that's just plain rude. You can agree to disagree, as there is likely a myriad of other things at their table or other tables you will like. This also applies if you don't like an artist's style, or you don't think the quality of their work is up to par with your tastes. If you don't have anything nice to say, just go to someone else's table to check out stuff that you DO like. You aren't obligated to look at every artists' work at a con.
-Start talking about your creative aspirations, like let me tell you all about this epic story I'm working on, you see, it all starts out with this amazing backstory and blah blah blah blah....(this happened to me once where the person literally spent AN HOUR telling me their entire story pitch for a book they had been working on, and...well, you can probably guess how uncomfortable that was for people who wanted to buy from me.)
-Tell the artists that you are also a struggling/starving artist, and therefore have no money to buy things at their table. This is not the time to get pity from them. Instead, offer to do an art trade for one of the less expensive items at their table. Sometimes this can be a nice way to trade art and then follow each other on social media. It's all about tact here!
-Complaining about how expensive something is at your table. Or worse, haggling with them to get a deal or better price. Chances are if you can't afford the item, they may have something else at the table you CAN afford. But at the end of the day, everyone CAN afford manners!!! *wags finger around like a nagging grandma*
-Say that you are going to come back to buy something at their table but then never do. This isn't the worst thing to do, as there are likely a large number of artists to browse when at a bigger convention and people can have a hard time finding you again, or remembering to come back before closing time. But perhaps don't use this tactic as a way of exiting the artist's table if you don't plan on coming back. Instead, it's better to just say thank you and walk away.
DO ask if you can touch/take pictures of the artists' items.
DON'T assume that they'll be okay with you touching displays/taking photos of their booth!
I have come across this a lot. Usually this doesn't bother me, because more likely they are simply taking photos of something they want to show a friend who might be interested. However, it can come across as rude if you are seen only taking pictures of someone's work and then walking away without having bought anything.
In some cases, this can be okay if the artist has placed a sign or part of their display out that includes their social media accounts or places you can follow them. Sometimes this is a cheaper and better alternative to business cards, since these days people are more likely to remember the photo they took of your Instagram handle instead of looking for your business card among the pile of other cards they grabbed from all the tables they visited.
DO be mindful of your cosplay, bags, backpacks, drinks/snacks, your personal space.
DON'T simply plop your stuff down on top of the artists' table!
Artist tables are not, I repeat, ARE NOT, places for you to park your stuff while you're browsing or taking pictures of cosplays that walk by. Sometimes this can result in merchandise being damaged, or more delicate displays falling apart. So be considerate! Sometimes you can get away with asking the artist if it's okay if you put your stuff down, but if it's food or drinks, then place them on the ground or somewhere where it's less likely to damage their stuff!
DO flip through an artist's comic or zine if that interests you.
DON'T read their entire comic, then walk away without buying it!
This has happened to me a few times, and it's like...seriously? You couldn't spare five or ten bucks to buy it? *waves hands in a frustrated manner*
Engaging with a creator about their story can be really great, but be considerate of the work they put in to making that book too.
CLICK HERE FOR PART 4: Things to Consider, Resources
Artist Alley 101: Things to Consider/Resources
Artist Alley 101: Planning What to Sell/Pricing
Artist Alley 101: The Basics/Applying for a Table


Hi this is super helpful but one quick question when you go to the cons like let’s say one even far away in other state how you travel with this all like how you get the stickers books pins plushies there do you ship it or have a person drive with the items there . How do artists get around with the stuff they will sell.